
// Remote Sensing
Project Overview
The purpose of this project is to display 3D geographic data in a visually appealing manner using PCI Geomatica's FLY! and Google Earth Pro. The data used was provided by the National Ecological Observatory Network (NEON), and was acquired in 2013. The purpose of this page is to give an overview of FLY!, discuss the pros and cons of the software, and provide a sample of what can be created with these methods.
3D Data Visualization of Teakettle, California

Data Location Indicator Map


Methods
To start a 3D flythrough tour, the first step is to open FLY! through the PCI Geomatica product window (Figure 1). Once selected, the DSM + RGB orthomosaic can be loaded into the project, which will open the data in the viewer window. The Control Panel and Perspective windows can be opened through the Edit menu, which will enable fine-tuned adjustments in position, direction, elevation, speed, and pitch for each waypoint within the tour (Figures 2 and 3).
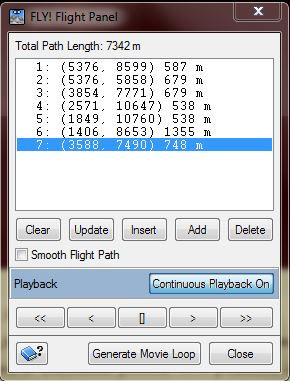
To begin a tour, you must first open the Flight Panel window (Figure 4). This window allows for the creation of individual waypoints, and will record all of the settings determined within the Perspective and Control Panel windows. By opening the Nadir view on the main FLY! window, an overview of the orthomosaic and flight path can be seen (Figure 5). Simply find the location and perspective of each waypoint you would like to record, add it to the Flight Panel window, and repeat until satisfied with the product.
Unfortunately, FLY! does not incorporate an efficient method of exporting video files, and therefore a screen recording program must be used to capture the flythrough. It is recommended that both the screen recording program and the FLY! video playback be set to 30 frames per second or greater for a smooth final product. The resulting screen recording can then be added into a video editing software for further improvements such as transitions, music, titles, and narration. For this project, I decided to capture some further 3D data footage through Google Earth Pro, which can be done through the "Record a Tour" feature. I recommend turning on both the '3D Building' and 'Terrain' layer, to allow Google Earth to display features in 3D. This video does an excellent job in explaining how to create the tour. Keep in mind that only Google Earth Pro can be used for this, and that it is currently free for everyone to use!

Figure 1: PCI Geomatica Product listing, with FLY! highlighted.
Figure 2: FLY! Control Panel window, with customizable settings for each waypoint.
Figure 3: FLY! Perspective window, allowing for
waypoint pitch adjustments.

Figure 4: FLY! Flight Panel window.
Figure 5: Nadir view, with current tour line
depicted in green.